Infrastructure Pod v4 à l’Université Grenoble Alpes (UGA)
Contexte
| Commentaires | |
|---|---|
| Date de réalisation | Septembre 2025 |
| Version de Pod | Pod v4.0.0 |
| Auteur | Alice LANGLOIS |
Ce document présente l’infrastructure et l’installation de la plateforme POD V4 à l’Université Grenoble Alpes. Celle ci a été installée “from scratch”, et remplacera notre plateforme POD 3.8. Il s’agit d’une plateforme de préproduction, cette documentation sera mise à jour jusqu’à sa mise en production.
Présentation de l’infrastructure
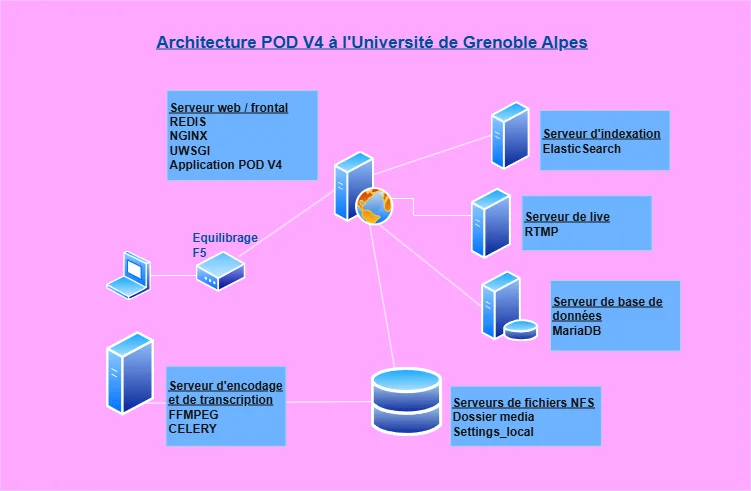
Cette infrastructure repose sur l’utilisation de :
- Serveur web/frontal : Pod v4, Nginx, uWSGI, Redis
- Serveur d’encodage/transcription : Celery, ffmpeg, Whisper, GPU Nvidia L4
- Serveur base de données : MariaDB
- Serveur d’indexation : Elasticsearch
- Serveur de fichiers : serveur de fichiers partagé NFS entre le serveur frontal et d’encodage (40 To - 38 To utilisé)
Tous les serveurs tournent sur Debian 12.
Étape 1 : Installation de POD V4
| Commentaires | |
|---|---|
| Serveurs concernés | serveur web/frontal, serveur d’encodage |
| Documentations de référence | Documentation ESUP Pod |
Création de l’utilisateur POD
sudo adduser pod
adduser pod sudo
su pod
Installation de Python 3.12 et mise en place de l’environnement virtuel
apt install -y build-essential libssl-dev zlib1g-dev libbz2-dev \
    libreadline-dev libsqlite3-dev wget curl llvm libncurses5-dev libncursesw5-dev \
    xz-utils tk-dev libffi-dev liblzma-dev python3-openssl git
wget https://www.python.org/ftp/python/3.12.8/Python-3.12.8.tgz
tar -xf Python-3.12.8.tgz
cd Python-3.12.8
./configure --enable-optimizations
make -j 8
make altinstall
pip3.12 install virtualenvwrapper --break-system-packages
En tant que user POD, modifier le fichier /home/pod/.bashrc :
export WORKON_HOME=$HOME/.virtualenvs
export VIRTUALENVWRAPPER_PYTHON=/usr/local/bin/python3.12
source /usr/local/bin/virtualenvwrapper.sh
Puis prendre en charge ces modifications :
source .bashrc
Et enfin créer l‘environnement virtuel :
sur le serveur frontal :
mkvirtualenv --system-site-packages --python=/usr/local/bin/python3.12 django_pod4
sur le serveur d’encodage :
mkvirtualenv --system-site-packages --python=/usr/local/bin/python3.12 django_pod4_encode
mkvirtualenv --system-site-packages --python=/usr/local/bin/python3.12 django_pod4_transcript
Pour entrer dans l’environnement virtuel :
workon django_pod4
Récupération du projet Esup POD V4
mkdir /data/django4
chown pod:pod /data/django4
cd /data/django4
git clone https://github.com/EsupPortail/Esup-Pod.git podv4
cd podV4
pip3 install -r requirements.txt
Pour utiliser la base de données MySQL/MariaDB sur le serveur frontal (ou sur un serveur distant) il faut installer le moteur MySql/Python :
sudo apt install pkg-config python3-dev default-libmysqlclient-dev
Puis dans l’environnement django_pod4, installer le moteur Mysql/Python :
pip3 install mysqlclient
Création d’un dossier pour les logs de l’application :
mkdir /var/log/pod
ls -n /data/django4/podv4/pod/log /var/log/pod/
Dans l’espace partagé NFS, créer un dossier Media et un fichier setting_local.py
Faire un lien symbolique depuis le dossier pod des deux serveurs, afin que ces fichiers soient partagés entre les deux serveurs :
ls -n pod/custom/setting_local.py /data/NFS/setting_local.py
ls -n pod/media /data/NFS/media
Étape 2 : Installation de MariaDB 10.11.6
| Commentaires | |
|---|---|
| Serveurs concernés | serveur base de données |
| Documentations de référence | Documentation Esup POD |
Après avoir installé MariaDB, éditer le fichier /etc/mysql/mariadb.conf.d/50-server.cnf :
character-set-server  = utf8
collation-server      = utf8_general_ci
Editer le fichier etc/mysql/my.cnf :
max_allowed_packet=256M
Donner les grant access à l’utilisateur pod :
GRANT ALL PRIVILEGES ON pod.* TO 'pod'@X.X.X.X IDENTIFIED BY 'mdp';
Installer le timezone dans le moteur mariaDB :
mysql_tzinfo_to_sql /usr/share/zoneinfo | mysql -u root -p mysql --database=mysql
Ajouter la configuration concernant la base de données dans le fichier pod/custom/setting_local.py :
DATABASES = {
    'default': {
        'ENGINE': 'django.db.backends.mysql',
        'NAME': 'pod',
        'USER': 'pod',
        'mdp': 'ceciEstUnSecretBienGardé',
        'HOST': 'X.X.X.X',
        'PORT': '3306',
        'OPTIONS':
         { 'init_command': "SET storage_engine=INNODB, sql_mode='STRICT_TRANS_TABLES', innodb_strict_mode=1", }, } }
Étape 3 : Installation de Redis
| Commentaires | |
|---|---|
| Serveurs concernés | serveur web/frontal |
| Documentations de référence | Documentation Redis |
Installer Redis :
curl -fsSL https://packages.redis.io/gpg | sudo gpg --dearmor -o /usr/share/keyrings/redis-archive-keyring.gpg
sudo chmod 644 /usr/share/keyrings/redis-archive-keyring.gpg
echo "deb [signed-by=/usr/share/keyrings/redis-archive-keyring.gpg] https://packages.redis.io/deb $(lsb_release -cs) main" | sudo tee /etc/apt/sources.list.d/redis.list
sudo apt-get update
sudo apt-get install redis
Pour activer et lancer Redis :
sudo systemctl enable redis-server
sudo systemctl start redis-server
Ajouter la configuration suivante dans pod/custom/setting_local.py :
CACHES = {
    "default": {
        "BACKEND": "django_redis.cache.RedisCache",
        "LOCATION": "redis://X.X.X.X:6379/3",
        "OPTIONS": {
            "CLIENT_CLASS": "django_redis.client.DefaultClient",
        },
        "KEY_PREFIX": "pod",
    },
    "select2": {
        "BACKEND": "django_redis.cache.RedisCache",
        "LOCATION": "redis://X.X.X.X:6379/2",
        "OPTIONS": {
            "CLIENT_CLASS": "django_redis.client.DefaultClient",
        },
    },
}

SESSION_ENGINE = "redis_sessions.session"
SESSION_REDIS = {
    "host": "X.X.X.X",
    "port": 6379,
    "db": 4,
    "prefix": "session",
    "socket_timeout": 1,
    "retry_on_timeout": False,
}
Modifier le fichier /etc/redis/redis.conf :
bind X.X.X.X 127.0.0.1
protect-mode: no
Il faut remplacer X.X.X.X par l’adresse IP du serveur hebergeant Redis.
Étape 4 : Mise en place de l’encodage
| Commentaires | |
|---|---|
| Serveurs concernés | serveur d’encodage |
| Documentations de référence | Documentation Esup POD |
FFMPEG
Installer ffmpeg (version 5.1.6-0+deb12u1) :
sudo apt-get install ffmpeg ffmpegthumbnailer imagemagick
Celery
Vérifier que Celery est bien installé sur chaque environnement virtuel :
pip show celery
Ajouter la configuration suivante dans pod/custom/setting_local.py :
USE_REMOTE_ENCODING_TRANSCODING = True # Active encode
ENCODING_TRANSCODING_CELERY_BROKER_URL = "redis://X.X.X.X:6379/5" # on utilise la db numéro 5
POD_API_URL = "https://pod.univ.fr/rest/"
POD_API_TOKEN = "<token>"

USE_TRANSCRIPTION = True
TRANSCRIPTION_TYPE = "WHISPER"

TRANSCRIPTION_MODEL_PARAM = {
    'WHISPER': {
        'fr': {
            'model': "small",
            'download_root': "/whisper/",
        },
        'en': {
            'model': "small",
            'download_root': "/whisper/",
        }
    }
}
Une fois que vous aurez accès à l’interface administrateur de votre POD, créez un jeton d’authentification lié à un utilisateur administateur sur l’application, qui sera la valeur de la variable
POD_API_TOKEN
Créer le fichier /etc/init.d/celeryd_encodet/etc/init.d/celeryd_transcript et y mettre le contenu de https://raw.githubusercontent.com/celery/celery/main/extra/generic-init.d/celeryd
Puis rendre le fichier exécutable :
sudo chmod u+x /etc/init.d/celeryd_*
Créer le fichier /etc/default/celeryd_encod et insérer le contenu suivant :
CELERYD_NODES="worker-encodage"
CELERY_BIN="/data/.virtualenvs/django_pod4_encode/bin/celery"
CELERY_APP="pod.video_encode_transcript.encoding_tasks"
CELERYD_CHDIR="/usr/local/django_projects/podv3"
CELERYD_OPTS="--time-limit=86400 --concurrency=1 --max-tasks-per-child=1  --prefetch-multiplier=1 -Q encoding -n encode"
CELERYD_LOG_FILE="/var/log/celery/%N.log"
CELERYD_PID_FILE="/var/run/celery/%N.pid"
CELERYD_USER="pod"
CELERYD_GROUP="pod"
CELERY_CREATE_DIRS=1
CELERYD_LOG_LEVEL="INFO"
Créer le fichier /etc/default/celeryd_transcript et insérer le contenu suivant :
CELERYD_NODES="worker-transcript"
CELERY_BIN="/data/.virtualenvs/django_pod4_transcript/bin/celery"
CELERY_APP="pod.video_encode_transcript.transcripting_tasks"
CELERYD_CHDIR="data/django/podv4"
CELERYD_OPTS="--time-limit=86400 --concurrency=1 --max-tasks-per-child=1  --prefetch-multiplier=1 -Q transcripting -n transcript"
CELERYD_LOG_FILE="/var/log/celery/%N.log"
CELERYD_PID_FILE="/var/run/celery/%N.pid"
CELERYD_USER="pod"
CELERYD_GROUP="pod"
CELERY_CREATE_DIRS=1
CELERYD_LOG_LEVEL="INFO"
Démarrer les workers Celery :
sudo /etc/init.d/celeryd_transcript start
sudo /etc/init.d/celeryd_encod start
Au cas où, pour vérifier que le fichier pod.settings ne contient pas d’erreur (à exécuter dans l’environnement virtuel):
python -m pod.settings
Étape 5 : Installation d’Elasticsearch
| Commentaires | |
|---|---|
| Serveurs concernés | serveur d’indexation, serveur web/frontal |
| Documentations de référence | Documentation ESUP Pod, Documentation Elastic.co |
Installation d’Elasticsearch (8.17.4) (sur serveur d’indexation)
Installer Java :
sudo apt-get install default-jdk
Installer ElasticSearch :
wget -qO - https://artifacts.elastic.co/GPG-KEY-elasticsearch | sudo gpg --dearmor -o /usr/share/keyrings/elasticsearch-keyring.gpg
echo "deb [signed-by=/usr/share/keyrings/elasticsearch-keyring.gpg] https://artifacts.elastic.co/packages/8.x/apt stable main" | sudo tee /etc/apt/sources.list.d/elastic-8.x.list
sudo apt-get update && sudo apt-get install elasticsearch
Création d’un user pod au niveau d’Elasticsearch :
sudo /usr/share/elasticsearch/bin/elasticsearch-users useradd pod -p podpod -r superuser
Paramétrage du mode sécurité d’ES 8
Génération des certificats pour activer le TLS :
sudo /usr/share/elasticsearch/bin/elasticsearch-certutil ca
sudo /usr/share/elasticsearch/bin/elasticsearch-certutil cert --ca elastic-stack-ca.p12
Deux certificats ont été créés :
/usr/share/elasticsearch/elastic-stack-ca.p12et/usr/share/elasticsearch/elastic-certificates.p12
Lancer la commande /usr/share/elasticsearch/bin/elasticsearch-certutil http afin de générer des certificats pour le cryptage http.
Saisir les noms d’hôtes et les adresses IP des machines à partir desquelles vous souhaitez communiquer avec elaticsearch via http :
Generate a CDR => no
Use existing CA => yes
pod-web-v4
pod-sql-v4
pod-encod-v4

XXX.XXX.XXX.XXX
XXX.XXX.XXX.XXX
XXX.XXX.XXX.XXX
Copier les certificats dans /etc/elasticsearch/
sudo cp /usr/share/elasticsearch/elastic-stack-ca.p12 /usr/share/elasticsearch/elastic-certificates.p12 /etc/elasticsearch/
sudo chown pod:pod /etc/elasticsearch/elastic-stack-ca.p12 /etc/elasticsearch/elastic-certificates.p12
sudo chmod +r /etc/elasticsearch/elastic-stack-ca.p12 /etc/elasticsearch/elastic-certificates.p12
Modifier le fichier /etc/elasticsearch.yml :
xpack.security.http.ssl:
  enabled: true
  verification_mode: certificate
  keystore.path: /etc/elasticsearch/elastic-certificates.p12
  truststore.path: /etc/elasticsearch/elastic-certificates.p12

# Enable encryption and mutual authentication between cluster nodes
xpack.security.transport.ssl:
  enabled: true
  verification_mode: certificate
  keystore.path: /etc/elasticsearch/elastic-certificates.p12
  truststore.path: /etc/elasticsearch/elastic-certificates.p12
Définir les mots de passe :
bin/elasticsearch-keystore add xpack.security.http.ssl.keystore.secure_password
bin/elasticsearch-keystore add xpack.security.http.ssl.truststore.secure_password
bin/elasticsearch-keystore add xpack.security.transport.ssl.truststore.secure_password
bin/elasticsearch-keystore add xpack.security.transport.ssl.keystore.secure_password
Lancement et vérification d’Elasticsearch
sudo systemctl daemon-reload
sudo systemctl enable elasticsearch.service
sudo systemctl start elasticsearch.service
Vérifier le fonctionnement d’ES 8 :
curl -k -XGET "https://127.0.0.1:9200" -u pod:podpod
Résultat :
{
  "name": "pod-1",
  "cluster_name": "pod-application",
  "cluster_uuid": "3HgKDjb6T7e6Mgt1oxB1Mg",
  "version": {
    "number": "8.17.4",
    "build_flavor": "default",
    "build_type": "deb",
    "build_hash": "c63c7f5f8ce7d2e4805b7b3d842e7e792d84dda1",
    "build_date": "2025-03-20T15:39:59.811110136Z",
    "build_snapshot": false,
    "lucene_version": "9.12.0",
    "minimum_wire_compatibility_version": "7.17.0",
    "minimum_index_compatibility_version": "7.0.0"
  },
  "tagline": "You Know, for Search"
}
Installation du plugin ICU :
sudo bin/elasticsearch-plugin install analysis-icu
sudo systemctl restart elasticsearch.service
Ou alors, si vous rencontrez des problèmes de pare-feu :
sudo CLI_JAVA_OPTS="-Dhttp.proxyHost=proxy.univ.fr -Dhttp.proxyPort=3128 -Dhttps.proxyHost=proxy.univ.fr -Dhttps.proxyPort=3128" /usr/share/elasticsearch/bin/elasticsearch-plugin install analysis-icu
Création de l’index Pod (sur serveur frontal)
Modifier le fichier pod/custom/setting_local.py :
ES_VERSION = 8
ES_URL = ['http://elastic.univ.fr:9200/']
ES_OPTIONS = {'verify_certs': False, 'basic_auth': ('pod', 'mdp')}
Modifier le fichier requirements.txt :
elasticsearch==8.17.2
Et dans l’environnement virtuel django_pod4 appliquer la modification précédente :
pip3 install -r requirements.txt
Puis lancer la création de l’index Pod :
python manage.py create_pod_index
Video index successfully created on ES.Félicitations !
Étape 6 : Installation de NGINX et UWSGI
| Commentaires | |
|---|---|
| Serveurs concernés | Serveur web/frontal |
| Documentations de référence | Documentation ESUP Pod |
Installation de NGINX
sudo apt install nginx
sudo apt install nginx-extras
sudo /etc/init.d/nginx status
Configurer NGINX :
sudo vim /etc/nginx/sites-enabled/default
Commenter la ligne listen [::]:80 default_server;
sudo vim /etc/nginx/nginx.conf
Ajouter la ligne suivante :
http {
[...]
     # Pod Progress Bar : reserve 1MB under the name 'uploads' to track uploads
 upload_progress uploadp 1m;
[...]
Copier le fichier pod/pod_nginx.conf dans le répertoire pod/custom, et modifier les paramètres si besoin.
cp /data/django4/podv4/pod_nginx.conf /data/django4/podv4/pod/custom/.
Créer un lien symbolique du fichier vers le dossier sites-enabled de NGINX, et redémarrer le service :
sudo ln -s pod/custom/pod_nginx.conf /etc/nginx/sites-enabled/pod_nginx.conf
/etc/init.d/nginx restart
Installation d’UWSGI
Dans l’environnement virtuel django_pod4, installer le module UWSGI :
pip3 install uwsgi
uwsgi --version
2.0.29
Copier le fichier pod/pod_uwsgi.ini dans le répertoire pod/custom, et modifier les paramètres :
cp pod/pod_uwsgi.ini pod/custom/.
vim pod/custom/pod_uwsgi.ini
chdir           = /data/django4/podv4
module          = pod.wsgi
home            = /home/pod/.virtualenvs/django_pod4
master          = true
processes       = 20
socket          = podv4.sock
chmod-socket    = 666
vacuum          = true
logto           = /var/log/pod/log/uwsgi.log
buffer-size     = 8192
Toujours dans l’environnement virtuel django_pod4, appliquer les paramètres :
sudo uwsgi --ini pod/custom/pod_uwsgi.ini --enable-threads --daemonize /var/log/pod/uwsgi-pod.log --uid pod --gid www-data --pidfile /tmp/pod.pid
Créer le service :
sudo nano /etc/systemd/system/uwsgi-pod.service
[Unit]
Description=Pod uWSGI app
After=syslog.target

[Service]
ExecStart=/usr/local/bin/uwsgi --ini /data/django4/podv4/pod/custom/pod_uwsgi.ini \
        --enable-threads \
        --pidfile /tmp/pod.pid
ExecStop=/usr/local/bin/uwsgi --stop /tmp/pod.pid
User=pod
Group=www-data
Restart=on-failure
KillSignal=SIGQUIT
Type=notify
StandardError=syslog
NotifyAccess=all

[Install]
WantedBy=multi-user.target
Puis activer le service, et le lancer :
sudo systemctl enable uwsgi-pod
sudo systemctl start uwsgi-pod
Étape 7 : Installation des dépendances et mise en route
| Commentaires | |
|---|---|
| Serveurs concernés | Serveur web/frontal |
| Documentations de référence | Documentation ESUP Pod |
Si besoin, installer Curl :
apt-get install -y curl
Installation de la dernière version de NodeJS (Node.js 22) et Yarn (1.22.22):
curl -fsSL https://deb.nodesource.com/setup_22.x -o nodesource_setup.sh
bash nodesource_setup.sh
apt-get install nodejs -y
npm install --global yarn
npm install -g npm@11.2.0
yarn --version
En tant que user pod, installer les dépendances dans le dossier pod :
cd /data/django4/podv4/pod
yarn install
Dans l’environnement django_pod4, déployer les fichiers statiques :
python manage.py collectstatic --no-input --clear
Lancer le script createDB, afin de créer les fichiers de migration et la BDD :
make createDB
Dans l’environnement django_pod4, créer un superutilisateur POD :
python manage.py createsuperuser
Configurer l’application POD
Voici la configuration de l’application POD à l’UGA :
Ces fichiers évoluerons lors du passage en https et lors de la mise en production des serveurs
pod/custom/settings_local.py :
SECRET_KEY = 'secretkey'

DATABASES = {
     'default':
     { 'ENGINE': 'django.db.backends.mysql',
      'NAME': 'pod',
       'USER': 'pod',
       'PASSWORD': 'mdp',
       'HOST': 'X.X.X.X',
       'PORT': '3306',
      'OPTIONS': { 'init_command': "SET storage_engine=INNODB, sql_mode='STRICT_TRANS_TABLES', innodb_strict_mode=1", }
      , }
      }

DEBUG = False

ES_VERSION = 8
ES_URL = ['http://elastic.univ.fr:9200/']
ES_INDEX = "pod"
ES_OPTIONS = {'verify_certs': False, 'basic_auth': ('pod', 'podpod')}

ALLOWED_HOSTS = ['pod-univ.fr', 'pod-univ']
BASE_URL = 'http://pod.univ.fr'

USE_DOCKER = False

TIME_ZONE = 'Europe/Paris'
EMAIL_HOST = 'smtp.univ.fr'
EMAIL_PORT = 25
DEFAULT_FROM_EMAIL = 'pod@pod.fr'
SERVER_EMAIL = 'noreply@pod.fr'
ADMINS = ('Admin', 'admin@pod.fr' )
LANGUAGES = (
    ('fr', 'Français'),
    ('en', 'English')
)

AUTH_TYPE = (('local', 'local'), ('CAS', 'CAS'))

USE_CAS = True
CAS_GATEWAY = True
POPULATE_USER = 'LDAP'
CAS_SERVER_URL = 'https://cas.fr'
LDAP_SERVER = {'url': 'ldap.fr', 'port': port, 'use_ssl': False}
AUTH_LDAP_USER_SEARCH = ('ou=people,ou=univ,dc=agalan,dc=org', "(uid=%(uid)s)")
AUTH_LDAP_BIND_DN = 'cn=cn,ou=ou,dc=fr'
AUTH_LDAP_BIND_PASSWORD = 'ldapMDP'
USER_LDAP_MAPPING_ATTRIBUTES = {'first_name': 'givenName', 'last_name': 'sn', 'uid': 'uid', 'affiliations': 'employeeType', 'mail': 'mail', 'primaryAffiliation': 'employeeType', 'establishment': 'aglnPrimaryOrganizationName'}


USE_ESTABLISHMENT_FIELD = True
ESTABLISHMENTS =  ['uga', 'UGA']
AFFILIATION = ( ('E', ('student')), ('P', ('employee')), ('I', ('affiliate')) )
AFFILIATION_STAFF = ('P')
AFFILIATION_EVENT = ['P']
CREATE_GROUP_FROM_AFFILIATION = False
CREATE_GROUP_FROM_GROUPS = False

ACTIVE_VIDEO_COMMENT =  True

MODELTRANSLATION_FALLBACK_LANGUAGES = ('fr', 'en')

THIRD_PARTY_APPS = ['enrichment','live']


USE_PODFILE = True
USE_DRESSING = True
USE_CUT = True
USE_IMPORT_VIDEO = True
USER_VIDEO_CATEGORY = True
USE_FAVORITES = True
USE_PLAYLIST = True
USE_QUIZ = True


AFFILIATION_EVENT = ['staff']
VIEWERS_ONLY_FOR_STAFF = True
HEARTBEAT_DELAY = 90

USE_IMPORT_VIDEO = True
RESTRICT_EDIT_IMPORT_VIDEO_ACCESS_TO_STAFF_ONLY = True

HIDE_USERNAME = True

USE_HYPERLINKS = False

USE_REMOTE_ENCODING_TRANSCODING = True # Active encode
ENCODING_TRANSCODING_CELERY_BROKER_URL = "redis://X.X.X.X/5" # on utilise la db numéro 5

POD_API_URL = "http://pod-univ.fr/rest/"
POD_API_TOKEN = "<api_token>"

FFMPEG_CMD = "shuf -i 0-5 -n 1 | xargs -I{} ffmpeg"
FFMPEG_CRF = 29  # -crf 20 -maxrate 3M -bufsize 6M
FFMPEG_PRESET = "slow"
FFMPEG_PROFILE = "high"
FFMPEG_LEVEL = 0
FFMPEG_HLS_TIME = 2
FFMPEG_INPUT = '-hwaccel_device {} -hwaccel auto -hide_banner -threads %(nb_threads)s -i "%(input)s" '
FFMPEG_LIBX = "h264_nvenc -strict experimental"
FFMPEG_MP4_ENCODE = (
    '-map 0:v:0 %(map_audio)s -c:v %(libx)s  -vf "scale=-2:%(height)s" '
    + "-preset %(preset)s -profile:v %(profile)s "
    + "-pix_fmt nv12 -level %(level)s -crf %(crf)s "
    + "-maxrate %(maxrate)s -bufsize %(bufsize)s "
    + '-sc_threshold 0 -force_key_frames "expr:gte(t,n_forced*1)" '
    + "-max_muxing_queue_size 4000 "
    + '-c:a aac -ar 48000 -b:a %(ba)s -movflags faststart -y -vsync 0 "%(output)s" '
)

USE_TRANSCRIPTION = True
TRANSCRIPTION_TYPE = "WHISPER"

TRANSCRIPTION_MODEL_PARAM = {
    'WHISPER': {
        'fr': {
            'model': "small",
            'download_root': "/whisper/",
        },
        'en': {
            'model': "small",
            'download_root': "/whisper/",
        }
    }
}

CACHES = {
    "default": {
        "BACKEND": "django_redis.cache.RedisCache",
        "LOCATION": "redis://X.X.X.X:6379/3",
        "OPTIONS": {
            "CLIENT_CLASS": "django_redis.client.DefaultClient",
        },
        "KEY_PREFIX": "pod",
    },
    "select2": {
        "BACKEND": "django_redis.cache.RedisCache",
        "LOCATION": "redis://X.X.X.X:6379/2",
        "OPTIONS": {
            "CLIENT_CLASS": "django_redis.client.DefaultClient",
        },
    },
}
SESSION_ENGINE = "redis_sessions.session"
SESSION_REDIS = {
    "host": "X.X.X.X",
    "port": 6379,
    "db": 4,
    "prefix": "session",
    "socket_timeout": 1,
    "retry_on_timeout": False,
}

TEMPLATE_VISIBLE_SETTINGS = {
    "TITLE_SITE": "Esup.Pod",
    "TITLE_ETB": "UGA",
    "LOGO_SITE": "img/logoPod.svg",
    "LOGO_COMPACT_SITE": "img/logoPod.svg",
   # "LOGO_ETB": "img/logo_etb.svg",
    "LOGO_PLAYER": "img/logoPod.svg",
    "FOOTER_TEXT": (
        "La Maison des Universités 103 Bvd St Michel",
        "75005  PARIS - France"
    ),
    "LINK_PLAYER": "http://www.univ.fr",
   # "CSS_OVERRIDE": "custom/mycss.css",
    "PRE_HEADER_TEMPLATE": ""
}
pod/custom/pod_nginx.conf:
# the upstream component nginx needs to connect to
upstream django {

  server unix:///data/django4/podv4/podv4.sock;

}

# configuration of the server
server {
  # the port your site will be served on
  listen      80 default_server;
  # the domain name it will serve for
  server_name pod-univ.fr
  charset     utf-8;

  # max upload size
  client_max_body_size 4G;   # adjust to taste
  # Allow to download large files
  uwsgi_max_temp_file_size 0;

  error_log /var/log/pod/nginx_pod_error.log;

  location ^~ /progressbarupload/upload_progress {
    # JSON document rather than JSONP callback, pls
    upload_progress_json_output;
    report_uploads uploadp;
  }

  # Django media
  location /media  {
    expires 1y;
    add_header Cache-Control "public";
    gzip on;
    gzip_types text/vtt;
    alias /data/django4/podv4/pod/media;  # your Django project’s media files - amend as required
  }

  location /static {
    alias /data/django4/podv4/pod/static/; # your Django project’s static files - amend as required
  }

  # Finally, send all non-media requests to the Django server.
  location / {
    uwsgi_pass  django;
    include /data/django4/podv4/uwsgi_params; # the uwsgi_params file you installed
    track_uploads uploadp 30s;
  }
}
Une fois ces étapes réalisées, vous devriez avoir une application POD fonctionnelle (ajout, encodage et publication de vidéos). Vous pouvez enrichir et personnaliser votre POD grâce aux différentes variables de configuration à ajouter sur votre fichier
settings_local.py